Hasselblad 500 C/M Camera

Since the beginning of my journey into film photography last April, I knew at some point, if the passion didn’t fade, that I would want to invest in a higher end film camera.

I had originally started off with my beloved Pentax K1000 as I knew I wanted a 35mm SLR camera and since this is a fully manual camera, I learnt lots about Aperture in relation to Shutter Speed and ISO with the help of the built in light meter in the camera.

Apart from my investment in some nice instant cameras such as the Leica Sofort and Polaroid SX-70 I suppose my next investment and step up into a film camera was my much loved Olympus Pen FT half frame camera. I love this camera and the image quality it produces.

In recent months I’ve been really getting into medium format photography. I really love having to think about my composition and how it can work into the square style box.

I think I must have a thing for composing a photo in a slightly different photo size as this is what I love about composing shots with the my Olympus FT.

I suppose my love of the medium format style photos first began when I bought a Diana F+ Camera cheaply on eBay.

As the months progressed I then bought another Lomography style camera, the Lubitel 166B which was originally meant to be a present for my husband as he had taken an interest in this camera but couldn’t get on with it when he tried it so I persevered and began using it.

I love the square format of the photos and I was starting to use more black and white film in it since I knew I wanted to do more darkroom work.

I always thought when investing in a high end camera it may be one of the Leica 35mm film cameras but my heart was telling me to invest in a medium format camera.

As we all know, there is so much choice in the medium format world. You can get fairly decent medium format film cameras ranging from a few hundred pounds right up to thousands of pounds.

If you had asked me in the summer of last year which high end medium format camera I would ever consider buying, I would have said the Pentax 67 which isn’t technically square but I was already in love with Pentax since owning the K1000 and thought I would love the fact the camera style and viewfinder can be used like a 35mm SLR camera.

However, I was fortunate enough to try out somebody’s Pentax 67 camera last year during a photography walk in Brighton. I knew instantly that it wasn’t for me. The main reason……because it was too heavy and big! I really struggled to hold that camera up to my eye and I knew that I would never use it or take it out with me if I owned one.

I had always thought that I would never like a ‘shoot from the hip’ style camera as that just seemed too weird to me to take a photo. However, after using the Lubitel 166B, I realised I loved taking photos in this way which I was really surprised at!

I then looked at potentially investing in a decent TLR camera and again was fortunate enough to have a friend who owns a decent Yashica TLR. However, on trying this, the dial placement just didn’t feel natural to me. I can’t really explain why as the picture quality and image in the viewfinder was much better than the Lubitel but I wasn’t falling in love with it. Also, I knew at some point I would like the option of interchangeable lenses. I know some of the TLR’s have this option but I just wasn’t feeling it.

I then looked at the various Bronica’s and Kiev’s at my local camera shop. Clocktower Camera’s had several for sale but again, on looking at each one, I just wasn’t feeling them.

I’m sure there are still loads and loads of medium format cameras I could have tried but by this point I started to consider the Mamiya and Hasselblad cameras.

Whilst I think the Hasselblad camera looks extremely stylish and I love the modular system, I really thought it wouldn’t be the camera for me either. Nowhere locally had one for me to try out and I didn’t know anyone that owned one although one of my friends used to own one years ago and told me how great they were.

Back in December I met up with one of my camera buddies for taking photos around London and we decided to head to the Camera Museum in Museum Street in Holborn so I could check out their Hasselblad collection as they specialise in repairing Hasselblad’s and also sell them.

The staff were really helpful in there and talked me through the different Hasselblad cameras from the more modern ones, to the V series.

Once I held one of the V series one’s (the 500 C/M to be exact) I instantly fell in love! I had seen the prices so knew I would only want to spend within the budget of the 500 C or C/M and I liked the fact they are fully manual which is what I personally look for in a film camera.

I was amazed at how light weight it was for a decent medium format camera! I was easily able to hold it with my left hand and turn the lens and fire the shutter with my right. It felt great. I loved the viewfinder which was very bright and clear, almost like looking at a television screen. The whole camera felt very natural to me.

The quality of the camera was amazing, it felt well built and not at all plastic.

I was very honest with the camera shop and admitted I didn’t have the funds to buy one there and then but that didn’t seem to bother them with the time they took going through the various camera’s with me which was lovely and helpful of them.

Even if I had the funds there and then I would have held back from purchasing one because I knew I needed to do more research. Also, the 500 C/M model from 1981 that I tried in the shop wasn’t in the best of condition cosmetically (although the price they were selling it for reflected that).

I had a lot of chats with different people about the Hasselblad cameras including one of my ex photography tutors who is also a professional photographer and does freelance work for companies such as Sunseeker Yachts and I really like his photography so I value his opinion. He knows my style of photography and also knows you can take photos hand held with this camera and he couldn’t find a bad word to say about this camera either. He also checked with a friend who owned a 500 C/M for quite a number of years before moving to digital and he also only had great things to say about the photo quality and use of the camera etc.

My ex tutor did say that for several hundred less the Bronica’s are quite good but he said I need to go with what I’m feeling and if I settled for a Bronica, I would only end up pining for a Hasselblad so would never be quite happy with the Bronica and I agreed with him.

I could have easily bought a Bronica since I had sufficient funds for one of those but I decided to be patient and save for the Hasselblad.

By this point I had also decided the Mamiya wasn’t for me. Although I had done much research on the different models and heard great things about those camera’s which I know are used by a lot of professional film photographers today. I suppose we have to just listen to what we would like rather than what everyone tells us is best for us and what we should like. Quite frankly my gut told me, buy the Hasselblad.

Through out January, I sold off a load of stuff I’d been meaning to sell for the past year and now I finally had an incentive to do it.

By last week I had made enough money to buy a Hasselblad 500.

I had already decided in my research that I wouldn’t buy a 500C, purely because I wouldn’t be able to change the viewfinder myself and I knew this may be something I possibly would want to change for a particular type of project at some point so it was going to be a C/M model.

I next had to decide on the type of lens as I initially liked the look of the original Chrome lenses but after further chats with the guys at the Camera Museum I discovered that they don’t have the special multicoated layer on the lens so I wouldn’t get as much contrast on clouds etc as I would with a later C T* lens (which are black not chrome). There is also a slightly later lens known as the CF and I was told the image quality wouldn’t be any different to the C T* but it just turned differently so it was personal preference on what style I would like out of these two. The CF lens is also a bit bigger which put me off and is also slightly more expensive so as a newbie to the Hasselblad system, I was quite happy to have a C T* lens when I bought my camera. I also knew for now, I would be happy with the standard 80mm lens since I had tried out the different size mm lenses (from the more zoom type to the wider angle) at the shop and got an idea of the scope of photo I could take through each one.

I already knew that I wanted to buy my camera from the Camera Museum, as they had been really helpful. Also, they provide new light seals with every second hand camera (which would normally cost £80 plus VAT if you asked them to do these for one of your Hasselblad’s) and they provide a 6 month warranty in case of any failures in the camera.

Since I would be spending quite a bit of money, I knew I wanted a warranty. I also knew I wouldn’t be getting any bargains on eBay or Gumtree as they were all going for the same price as what the Camera Museum was charging, if not more on some of them!

Whilst saving for one, the Camera Museum had listed a 500 C/M model for sale which was in a condition I was happy with (unlike the one I viewed in December). This particular model was from 1978 which again, I was happy with. After having a chat with them on Wednesday, I got on a train that morning and tried it out. I spent over an hour with them going through the workings of it. I was extremely impressed by the overall condition, especially the back curtains as you can see in the photo below:

We went through all the shutter speeds which seemed to work perfectly. I was also warned about potentially jamming the camera if I take the lens off and it’s been fired and the camera hasn’t etc so I need to make sure they all match before putting back together. So currently I’m a bit scared of accidentally doing this but hopefully I won’t!

Needless to say I purchased the camera along with a nice original thick Hasselblad strap in excellent condition to give me good support as again, the joys of visiting an actual shop rather than buying the camera online meant that I could try out various straps. I had liked the look of the thin leather strap but after trying it, the camera easily slipped off my shoulder and it just didn’t feel that well supported so I knew that I would need the thicker strap.

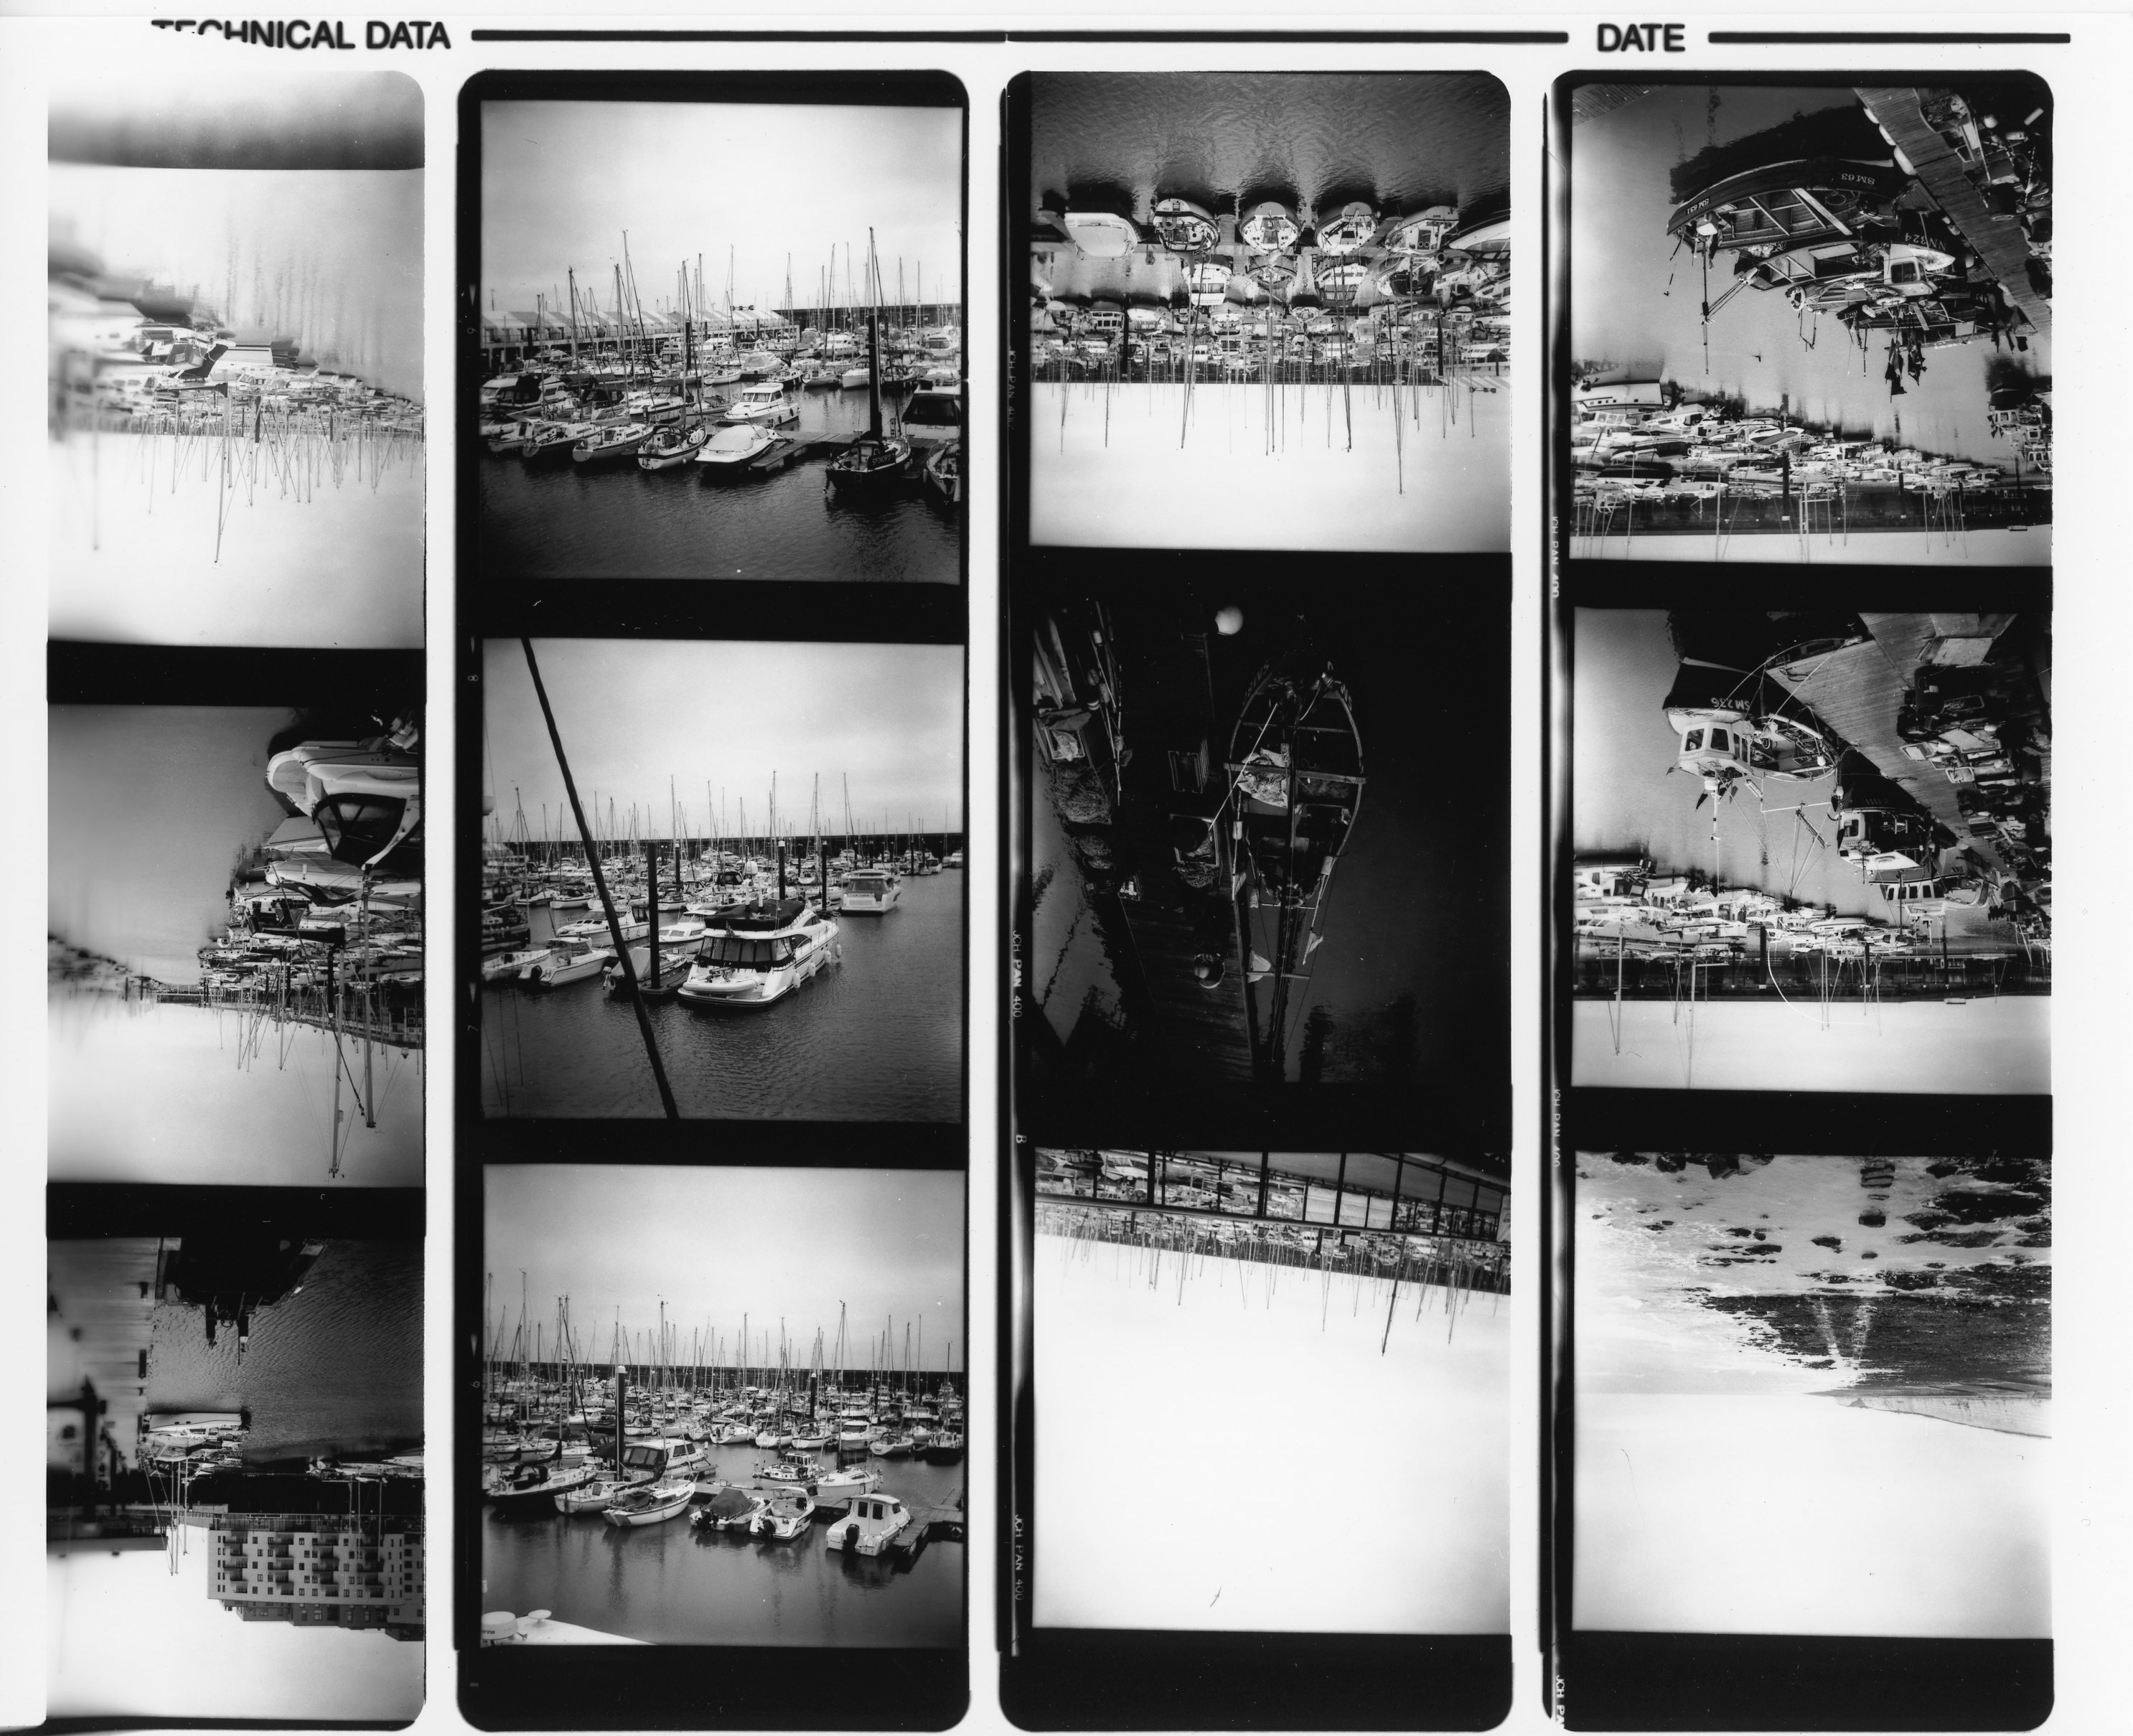
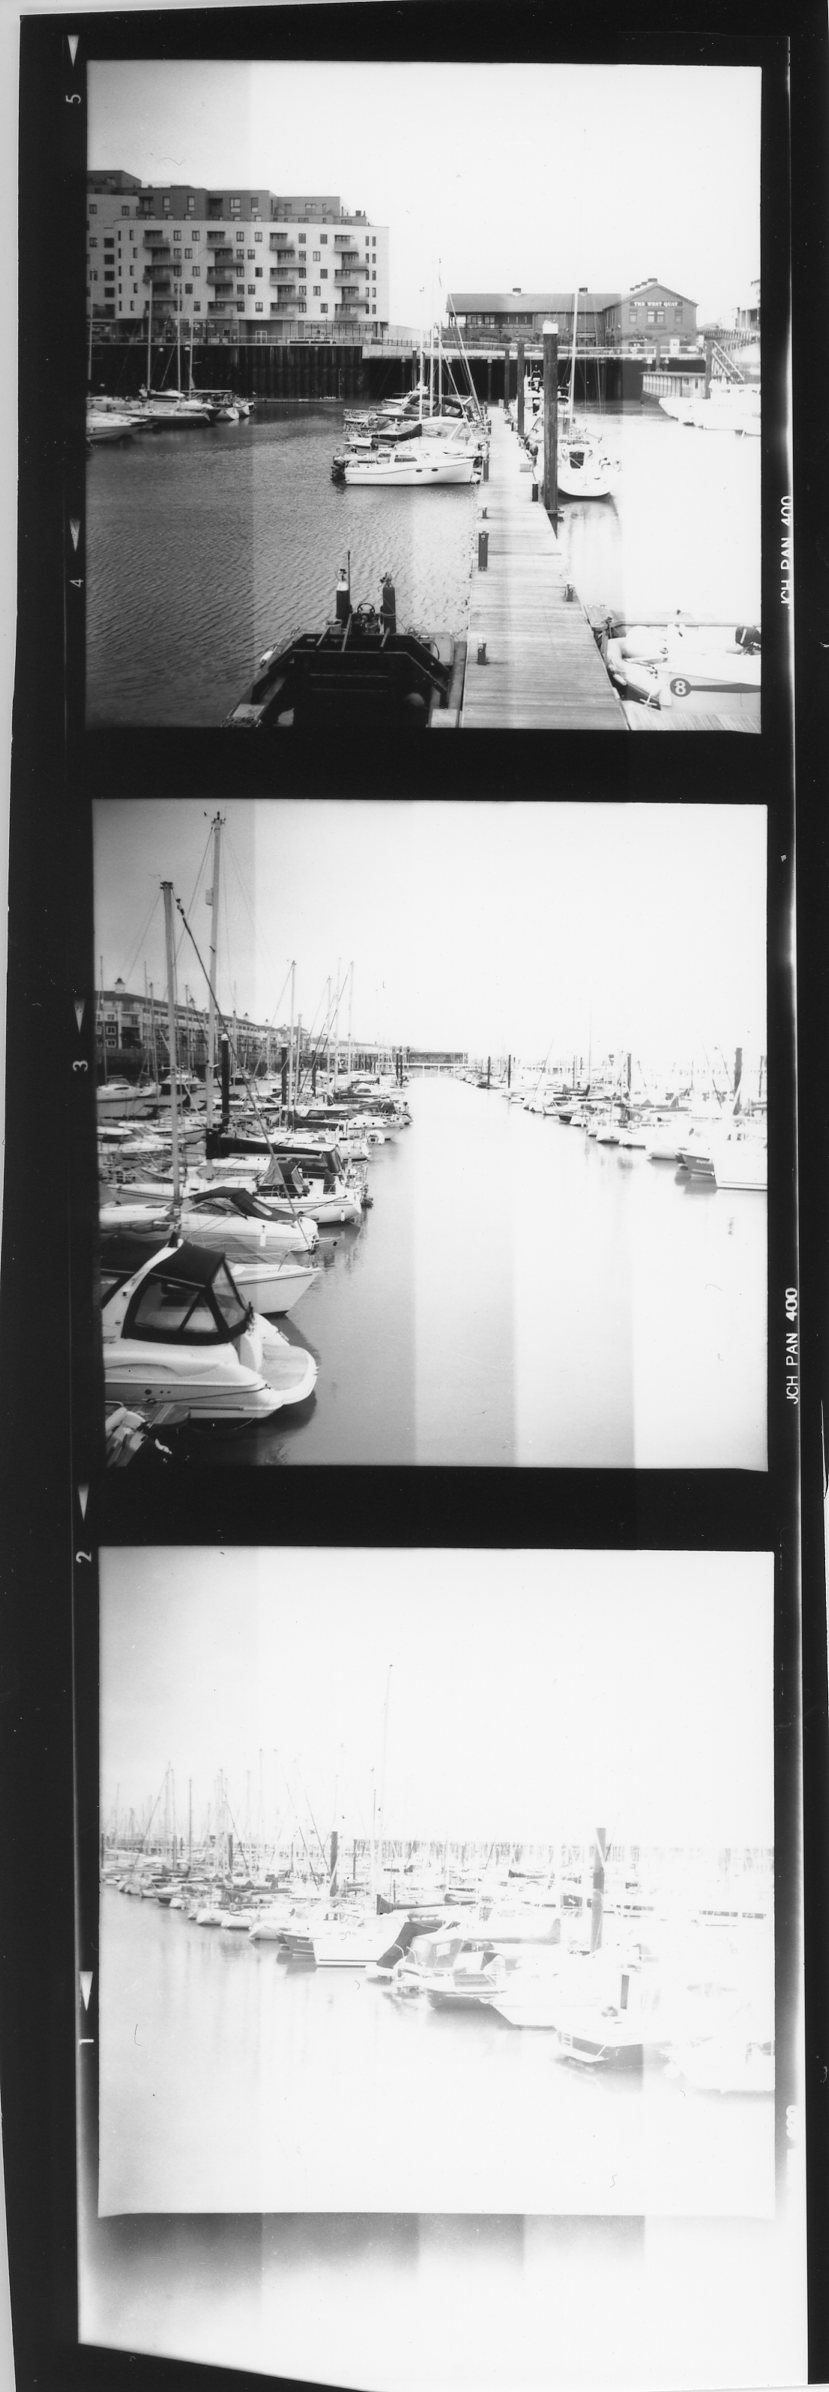
They also gave me a free black and white film which I loaded into the camera in front of them so they could make sure I did this properly. It also meant I was ready to go and shoot. I would have loved to have taken some shots in London but I had to rush back to Brighton on the train before rush hour ensued so I used the film locally.

I’ve since got the roll of film developed and am extremely happy with the results. I’ll be blogging about this separately since this blog is really long so thank you to everybody who has taken the time to read it.

For anybody interested in purchasing a Hasselblad, accessories or who would like some more information about the camera or getting a repair done, their website is:

https://www.cameramuseum.uk

Printing Contact Sheets in the Darkroom using the Paterson 6 x 6 Proof Printer

In one of my previous blogs I mentioned my obsession with printing contact sheets which I had been doing for 35mm negatives and I had a Paterson Proof Printer specially for this.

Since I’ve recently been getting more into medium format photography and when I knew I was going to continue to do prints in a darkroom, I decided to invest in a 120mm Proof Printer from Paterson.

I bought mine brand new on eBay since I struggled to find any second hand ones at a cheaper price in this particular format.

I decided to try it out on my first session in the Brighton Community Darkroom.

However, I made a couple of mistakes. First of all I’m not sure if the mistakes were due to me concentrating so much on mixing up the chemicals and getting used to the enlarger but I’ll explain what I did.

Here is a picture of the first contact sheet I did:

I did the usual test strips first to check the exposure times etc. These photos were taken at Brighton Marina using my Lubitel 166B camera and JCH Streetpan 400 black and white 120mm film. The film is naturally high in contrast which I love.

The first mistake I made was not matching the negatives the correct way round in the proof printer. In my haste to get a contact sheet printed and check I was using the enlarger correctly, I had just put the negatives into the proof printer without really thinking about the direction etc which resulted in this print.

Also, I noticed that the end photo hadn’t quite printed fully. I was perplexed as to why this was and thought perhaps there was something wrong with the proof printer?

I re-read the instructions of how to use the proof printer (which quite honestly, is pretty self explanatory) but I thought I must be doing something wrong. I still couldn’t figure out what I had done wrong. I then read the instructions again and saw the key sentence that I originally must have kept skimming over when reading them originally and here is the mistake I made:

When I print the contact sheet, I was putting the 8 x 10 inch photo paper directly onto the grey sponge area then shutting down the top screen which contained the negatives and subsequently taking an enlargement:

What was happening was that the border where the hinge is on the front screen, was blocking part of the negative from transferring onto the paper, hence why I wasn’t getting the full photo.

Finally I realised from the instructions that I should have been placing the photo paper into the slot of the where the hinge is directly onto the negatives on the glass front:

I’m sure to most people this would seem really obvious, even without reading the instructions, and I’m somewhat embarrassed to admit I did this mistake, but I do tend to lack common sense sometimes!

Once I realised my mistakes, I decided to re-print these negatives again during another session in the darkroom.

I used a No 2 Contrast Filter and did a test strip using exposure times of 30 seconds:

From the test strip I decided on an exposure time of 2 1/2 minutes. Before I printed the whole contact sheet again, I did another test strip at the full 2 1/2 minutes exposure to check I was happy with that:

You’ll see that the last photo was much lighter but I have to make some compromises when doing a contact print so was happy with this and here is the final result:

First of all, I’m pleased I managed to get all the images the right way round! You’ll see that a couple of the photos are under exposed but at least I get an overview of the photos and can then choose which ones I’d possibly like to work on for enlarging into prints.

I’m very happy that I now know how to use the contact proof printer correctly and will be using it for all my black and white medium format negatives when I need to do a contact sheet.

Developing Prints in the Darkroom

I have now visited the Brighton Community Darkroom a couple of times since I joined and am slowly getting more familiar with the Durst DA 900 enlarger every time I use it.

Currently I’m managing to get there once a week and am spending approximately 4 hours there per session.

I was there yesterday afternoon and wanted to work on developing some prints from my 120mm black and white negatives that I took on my Lubitel 166B Camera.

There was a really nice beach shot I recently took on a stormy day in Brighton and the waves were crashing against the sea defence wall and there were some clouds in the sky.

I’m still very much at the learning/experimental stage of my darkroom work so accept the fact that without a tutor on hand (like during my black and white photography course) I’m going to probably make many mistakes and waste a lot of paper.

Yesterday was my first time enlarging a 120mm negative print on the Durst DA 900 enlarger as in previous sessions I had been making contact sheets.

I was slightly nervous if I was actually going to do it correctly. I had an initial introduction to the enlarger by one of the helpful members of the community darkroom but that was a few weeks back so I wasn’t sure what I’d remember.

Thankfully, as well as an actual manual on the enlarger, there were some helpful notes provided to me by Paul who is one of the community members and in the notes he provided his recommended combination of condenser and lens that he feels work best depending on the size negative I’m doing an enlargement from.

Rather than going by the manual recommendation, I used Paul’s guidelines since he has experience of using this particular enlarger.

I therefore used a Unicon 105 Condenser lens and 105mm enlarger lens for the 120mm (6cm by 6cm) negatives.

After doing an initial test strip, here is the print I did with the aperture moved down a couple of stops from the brightest aperture to f/8:

You’ll see that its quite dark and doesn’t have much contrast. I also was annoyed at the fact there were dust/hair marks on the photo, which I hadn’t noticed on the negative. I currently use a cheap plastic air blower but I’m seriously considering investing in the more powerful aerosol type of blower as I think that will do a better job of getting rid of unwanted hair/dust as I don’t think my current one works very well.

I decided from this initial print that I wanted more contrast in the photo and also to be lighter.

I had learnt about contrast filters at my college course and thankfully the community darkroom has the Ilford Multigrade filters that I can add to the condenser lens.

I decided to try a No 3 contrast filter and again, did a test strip. I also removed best I could with the equipment I currently have, any unwanted hair/dust on the negative.

Here is the print I did with an exposure of 40 seconds:

This photo is much brighter than the original one I did but I’ve also lost all the cloud detail.

I looked at my test strip again and decided to do another print with the same No 3 contrast filter and a slightly longer exposure time of 50 seconds:

This resulted in a slightly darker photo (as you would expect) but there still wasn’t much cloud definition.

I decided at this point that I perhaps didn’t want so much contrast so changed the contrast filter to No 2 and did another test strip. I did the following photo with an exposure of 80 seconds:

I was much happier with this photo in the fact it was lighter than the original one I did and that it had the cloud definition.

I wanted to next experiment with a No 2.5 contrast filter just to see the difference but I unfortunately ran out of time in my darkroom session so will have to try that next time.

Although the photos aren’t perfect yet, I’m really enjoying the whole process of experimenting and the trial and error.

I noticed on this final photo that more dust had managed to somehow get onto the negative which shows in certain areas of the photo so I really do need to find a way of making sure I can fully clean the negative. I do also wear white fabric gloves when handling the negatives to avoid finger marks.

I look forward to blogging more about my darkroom sessions as I learn more.

Lomography Redscale XR 120mm Film and my Lubitel 166B

I recently purchased a triple pack of Lomography Redscale 120mm film for £5.00 which had expired back in 2012.

I’ve shot redscale film on my 35mm film camera’s before but thought it would be fun to test out on my Lubitel 166B camera during the daytime.

Here are some photos I took using a roll of the film:

The rescale wasn’t as ‘red’ as I thought it was going to be but I wonder if that was because the film was several years old. Instead, I thought the pictures had more of a Sepia tone to them. I also note that the film states to have an ISO of 200 for super-intense red and orange colours and ISO 25 if you want to mix additional tones of blue and green to the image. The Lubitel doesn’t have a light meter but from my previous use of the camera and the weather we have in the UK in the winter, I tend to shoot the Lubitel with a shutter speed of 1/125s and an aperture between f/5.6 and f/8.

Either way, I think the Sepia tone works quite well with the garden images I took.

Using the Ilford HP5 Plus Black and White 120mm film with my Lubitel 166B

Since I really loved the previous black and white photos I had taken using my Lubitel 166B, I thought I would try out the Ilford HP5 Plus film as it’s a very easy film to get hold of in a few of my local shops in Brighton.

The more I use the camera, the more I continue to love it. Since my last blog, I’ve now discovered how to focus the photo properly by using the attached magnifying glass in the viewfinder and looking at the central circle in the viewfinder.

I also thought I’d test out the eye level viewfinder on the camera which is a small square in the plastic at the top so you don’t actually look into the picture part of the camera. Here are two photos I took using this method of shooting:

I didn’t feel that using the little square viewfinder gave an accurate image of  what I inevitably shot so I know I definitely prefer using the actual picture viewfinder and mainly shooting from the hip.

It was a cloudy, windy day in Brighton and the waves were immense. I wanted to capture this as best I could using the Lubitel and here are the results:

I wasn’t sure when taking the photos if I was going to find them boring once developed but I do really like them. Again for me, I just really like the style of photo this camera produces.

Shooting black and white film with the Lubitel 166B

Following on from my recent blog about using the Lubitel 166B camera for the first time and after being quite impressed with the photos I took with some colour 120mm film, I knew I wanted to try out some black and white film in the camera.

I had some Lomography Lady Grey 400 120mm black and white film in my stash so promptly loaded the camera with it and had a walk along Brighton Beach.

I’m still getting used to the camera so there were again some wonky photos but that aside, I was really impressed with the overall style of the black and white photos that the camera produced.

Here are some of the photos I took and you can judge for yourselves:

img787fullsizeoutput_1826fullsizeoutput_1827fullsizeoutput_1828fullsizeoutput_1829fullsizeoutput_182ffullsizeoutput_182bfullsizeoutput_182cfullsizeoutput_182dfullsizeoutput_182e

I’m definitely going to be shooting more black and white film with this camera, perhaps with some different makes of film to see the difference in the photos.

Lubitel 166B TLR Camera

I recently became aware of the Lubitel range of cameras when I arranged for my husband, a couple of friends and myself to go on a photography workshop with Lomography in London.

We were to choose one of their range of cameras for the workshop which, involved an evening of wondering around Soho for a couple of hours taking night time shots with one of their loaned cameras.

We had to decide on which camera’s we would like to try beforehand so they could make sure it was available at the workshop. I therefore showed my husband the range of camera’s on the Lomography website and he decided that he liked the look of their Lubitel 166+ camera.

I asked him what he liked about it over the other cameras and he said he liked the fact it was a medium format camera using 120mm film (as he likes the square photos) and that you have to look down into the viewfinder rather than a standard camera that you put up to your eye. He also liked the fact it had two lenses rather than one and just the general box style of it.

I had never been particularly interested in this style of camera before. However, the more I researched it, the more fascinated I was by it.

When I booked the workshop, Lomography informed me that they may not have a spare Lubitel 166+ camera for my husband to try as they had already loaned one out and wasn’t sure if it would be back in the shop in time for the workshop.

I thought this would be a shame since he seemed so keen on trying it out so I thought about buying him one as a surprise so he would have his own to keep instead.

However, I wasn’t prepared to pay £289.00! I therefore began the hunt of finding a second hand cheaper one….

I quickly discovered that the actual Lomography 166+ Camera doesn’t seem to come up for sale second hand that often. There was one on eBay for £40 but it didn’t have it’s original box or any of the accessories that it would have originally come with. It also wasn’t in great condition with marks on the paintwork.

I knew from my research that this camera was based on the original Lomo Russian Lubitel camera and quickly found that various models of the original Lubitel camera are for sale in abundance second hand and at a price that doesn’t break the bank.

I quickly decided that I would like to buy him the Lubitel 166B model since it was a bit more simplified than the earlier models, plus it is easy to do multiple exposures if you wanted to because you have to wind the film on manually with this particular model.

Ideally I wanted to buy one that had the original box, instruction manual and accessories. A few complete ones I found on eBay in great condition unfortunately also came with a higher asking price of £60-£80 plus.

As luck would have it, I ended up purchasing one completely boxed in mint working condition (looked like it had hardly ever been used) with the original box, a film winding spool, soft case, lens cap, neck strap (still in packet!), english instruction manual and cable release from a guy in Littlehampton, which had recently been listed on Etsy for £34.50. What was even more lovely was that the date of manufacture is handwritten on the back of the instruction manual (February 1986):

fullsizeoutput_17f9

So I attended the Lomography Workshop and fortunately they were able to loan my husband the Lubitel 166+ camera. Since he isn’t that familiar with film camera’s, it quickly became clear that he had picked a rather complex camera to try out since it doesn’t have a built in light meter and the way of winding the film on in this camera and how to point and shoot it was extremely unusual to him.

On this particular evening in London, there was a constant heavy down pour of rain throughout the whole evening and we got completely drenched. It meant that it was very difficult for any of us to try and take decent photos outside and I found myself constantly apologising to my friends and husband for dragging them all they way from Brighton on the train (which had engineering works so was a long journey each way) to an event that none of us were really enjoying due to the bad weather.

What made things worse is that within 5-10 minutes of us leaving the Lomography shop to take our photos, it became clear that there seemed to be a fault with the Lubitel 166+ camera my husband was trying to use and it just didn’t seem to wind on properly and we weren’t sure if any of it was actually working at all. By this point we had lost the leader of the lomography workshop and was doing our own thing until it was time to return back to the shop and hand back our loan cameras and the films to be developed.

The following week, once our films had been developed by Lomography, we discovered that the Lubitel 166+ hadn’t produced any photos whatsoever and the roll came back blank so the camera hadn’t worked at all which was a shame.

This in turn, put my husband off completely using this style of camera. I then had to break the news to him that I had actually treated him to a version of one and as you can imagine, he wasn’t very excited by this.

So the camera arrived in the post and since I knew my husband wouldn’t be using it anytime soon I decided I would try it out for myself.

I managed to pick up a copy of the ‘Lubitel+ Love from the waist level’ book by Lomography cheaply on eBay (since Lomography have currently sold out of this book) and after reading that (which I really enjoyed) and watching various youtube videos and reading the actual Lubitel 166B instruction manual, I took the camera out to play and test that it actually worked.

As mentioned before, it doesn’t have a built in light meter and the photos I took was on a cloudy day. I was using Lomography Colour ISO 400 120mm film in the camera and rather than use a light meter, I went by my gut and my experience from using my Pentax K1000 camera and shot the film at aperture f/8 with a shutter speed of 1/125.

After my husband’s experience with the camera in London, I was quite nervous about getting the photos developed as I wasn’t sure I had done anything right on the camera and if there would be any photos. The main reason for this is because the shutter button releases so fast when pressed that it almost doesn’t feel like the camera has taken an actual photo.

Yesterday, I picked up the negatives from Colourstream in Brighton and thankfully there were photos…..11 in total! I knew I had missed a frame because I accidentally wound the camera on over one frame in error and couldn’t figure out how to wind it back.

Here are the photos:

fullsizeoutput_17e8fullsizeoutput_17e9fullsizeoutput_17eafullsizeoutput_17effullsizeoutput_17ecfullsizeoutput_17edfullsizeoutput_17f0fullsizeoutput_17f3fullsizeoutput_17eefullsizeoutput_17f2fullsizeoutput_17f1

To be honest, I wasn’t sure what to expect which in my opinion is part of the fun of film photography.

However, I am quite impressed by the colours and detail in these photos! I really love the overall feel and style of photo that the camera produces. The last image is a double exposure as I wanted to see how that would look but I chose a tree and a bush to photograph which seem to merge so it may be difficult to tell that it’s actually a double exposure.

I really love this camera which I’m quite surprised at. I’ve much to learn still as some of the photos are wonky because I’m not used to shooting a camera ‘from the hip’ so to speak so I’m currently working out the best way of holding the camera to keep the image as straight as possible without having to use a tripod.

I feel this camera actually suits my style of photography because it is a slow camera. By that I mean that you have to take your time in taking a photograph as it’s not easy to point and shoot. You have to really work on getting the photo as you want it in the viewfinder and it shows as a reversed image which I’m actually fine with but I can imagine some people may find that quite tricky to work with if they want absolute precision of an image. As I work quite artistically with my photography, there is give in my style of photos so they don’t have to be 100% accurate to what I’m actually seeing.

A lot of my photos tend to be of still objects so I can patiently take my time perfecting the shot to how I want it to be. I would imagine in other fields of photography such as street photography that this camera would be an absolute nightmare to use because I would imagine the moment would have passed in the time it would have taken to line up the shot, get the exposure correct and distance etc.

I also need to work on the distance scale. From my first attempt, I couldn’t seem to see the focus in the viewfinder making any difference if I changed the lens from 1 metre to infinity. Apparently from what I’ve read the camera has a well know flaw for this and most people just tend to shoot with it on infinity.

You’ll see that some of my photos do seem out of focus so I’m hoping as I use the camera more, I’ll become more accurate with the focusing and if not, then perhaps I’ll just have to see that as being a fun quirk of the camera!

Now I know it can take photos, I’m going to be using it a lot to learn more about how it works. This camera is also quite light weight as I suppose it is cheap and cheerful in comparison to better made TLR’s but I actually like that because it is easy for me to walk around with it.

I look forward to blogging further about this camera as and when I take more photos with it.

I’m also hoping that when I show my husband the photos, it may encourage him to try it out again.